


Introduction
Photoshop is a powerful tool for graphic design and image editing, offering a wide range of features and functionalities. One of its notable features is the 3D mode, which allows users to create three-dimensional designs and manipulate them in a virtual space. However, navigating and exiting the 3D mode in Photoshop can sometimes be confusing for beginners. In this article, we will provide you with a comprehensive guide on how to exit 3D mode in Photoshop, ensuring a smooth transition back to the standard editing interface.
How to Exit 3D Mode in Photoshop
Exiting the 3D mode in Photoshop is a straightforward process. Follow the steps below to return to the regular editing workspace:
Step 1: Locate the 3D Panel
To exit the 3D mode in Photoshop, you first need to locate the 3D panel. The 3D panel is where you can access various 3D tools and functions.
Step 2: Switch to the Layers Panel
Once you have located the 3D panel, you need to switch back to the Layers panel. The Layers panel displays all the layers in your document, including the 3D layers.
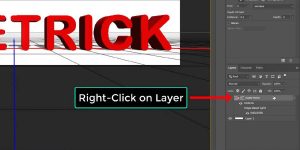
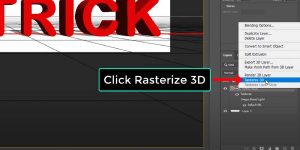
Step 3: Remove 3D Layers
In order to exit the 3D mode completely, you must remove all the 3D layers from your document. To do this, simply select the 3D layers in the Layers panel and delete them.
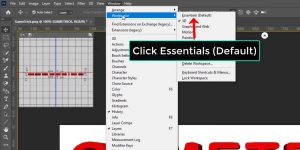
Step 4: Reset the Workspace
After removing the 3D layers, it’s a good practice to reset the workspace to ensure a clean slate. You can reset the workspace by going to the “Window” menu and selecting “Workspace,” then choosing “Reset [Workspace Name].”
Step 5: Confirm Exit
Finally, to confirm that you have successfully exited the 3D mode, check if the 3D panel is no longer visible. If the panel is no longer present, it means you have successfully exited the 3D mode in Photoshop.
By following these simple steps, you can exit the 3D mode in Photoshop and resume working in the standard editing environment.
Frequently Asked Questions (FAQs)
Here are some frequently asked questions regarding how to exit 3D mode in Photoshop:
How Do I Know if I’m in 3d Mode in Photoshop?
When you’re in 3D mode, you will see the 3D panel displayed on your screen, providing access to various 3D tools and options.
Can I Switch Between 3d Mode and Regular Editing Mode?
Yes, you can switch between 3D mode and regular editing mode in Photoshop. Simply follow the steps mentioned earlier to exit the 3D mode and return to the standard editing workspace.
Will Exiting 3d Mode Delete My 3d Designs?
Exiting the 3D mode in Photoshop does not delete your 3D designs. It only switches your workspace back to the standard editing environment. Your 3D designs will still be available in your layers, allowing you to modify or manipulate them further if needed.
What if I Accidentally Exit 3d Mode?
If you accidentally exit the 3D mode, don’t worry. You can always go back to the 3D mode by navigating to the “Window” menu and selecting “3D.”
Are There Any Keyboard Shortcuts to Exit 3d Mode?
Unfortunately, Photoshop does not have a specific keyboard shortcut to exit the 3D mode. However, you can create custom shortcuts using the Keyboard Shortcuts option in the Edit menu.
Can I Save My 3d Designs After Exiting 3d Mode?
Yes, you can save your 3D designs after exiting the 3D mode. Simply go to the File menu and choose the “Save” or “Save As” option to save your Photoshop document.
Conclusion
Mastering the art of navigating and exiting the 3D mode in Photoshop is essential for graphic designers and digital artists. By following the steps outlined in this guide, you can easily exit the 3D mode and continue your creative journey in the standard editing environment. Remember, removing the 3D layers, resetting the workspace, and confirming the exit will ensure a smooth transition and optimal Photoshop experience.
You may also read how to repair a neck joint in Photoshop