

Are you an artist or designer looking to create stunning digital illustrations? If so, you’ve probably heard of Procreate, one of the most popular and powerful digital art apps available. One of the key features of Procreate is its ability to automatically trace images, allowing you to quickly and easily convert a reference image into digital artwork. In this article, we will guide you through the process of how to automatically trace an image in Procreate, providing you with step-by-step instructions and useful tips to enhance your digital art skills.
Introduction to Image Tracing in Procreate
Before we delve into the details of how to automatically trace an image in Procreate, let’s first understand what image tracing is and why it’s such a valuable tool for artists and designers. Image tracing refers to the process of converting a raster image, such as a photograph or a scanned drawing, into a vector format. This allows you to scale the image without losing quality and manipulate individual elements more easily.

Image tracing can save you a significant amount of time and effort, especially when working on complex illustrations or logos. Instead of manually recreating the shapes and lines of an image, Procreate’s image tracing feature analyzes the image and creates a vector representation automatically. This feature is particularly useful when you want to recreate a hand-drawn sketch or incorporate an existing image into your artwork.
How to Automatically Trace an Image in Procreate
Now that we have a basic understanding of image tracing, let’s dive into the step-by-step process of how to automatically trace an image in Procreate. Follow these instructions to harness the power of Procreate and transform your artwork.
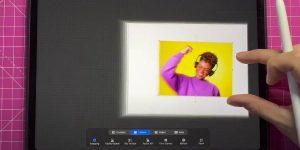
Step 1: Importing an Image
To begin, launch the Procreate app on your device and create a new canvas or open an existing one. Once you’re in the canvas, tap on the wrench icon located at the top left corner of the screen. This will open the Actions menu. From the Actions menu, select the “Add” option and choose “Insert a photo” from the drop-down menu. You can import an image from your device’s photo library or cloud storage.

Step 2: Adjusting the Image
After importing the image, you may need to make some adjustments to ensure optimal tracing results. Procreate provides various editing tools that allow you to crop, resize, rotate, and adjust the opacity of the image. You can access these tools by tapping on the “Transform” button located at the top right corner of the screen.
It’s important to note that the quality of the traced image depends on the clarity and contrast of the original image. To achieve the best results, choose a high-resolution image with well-defined lines and distinct color contrast.
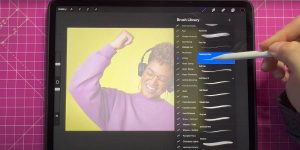
Step 3: Enabling the Tracing Feature
Once you have made the necessary adjustments to the image, it’s time to enable the tracing feature in Procreate. Tap on the “Layers” button located on the top right corner of the screen to open the Layers panel. From the Layers panel, tap on the “+” button and select the “Image” option. This will create a new layer specifically for the traced image.
Step 4: Tracing the Image
With the image layer selected, tap on the “Actions” button located at the top left corner of the screen. From the Actions menu, choose the “Drawing Assist” option. In the Drawing Assist menu, toggle on the “Automatic” switch to activate the automatic tracing feature.
As soon as you enable the automatic tracing feature, Procreate will analyze the image and generate a vector representation of the outlines and shapes. You can further adjust the level of tracing precision by adjusting the “Threshold” slider in the Drawing Assist menu. Moving the slider to the right increases precision while moving it to the left results in a looser trace.
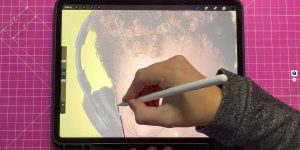
Step 5: Refining the Traced Image
Once the image has been traced, you may want to refine the results to suit your artistic vision. Procreate offers a variety of tools that allow you to edit and enhance the traced image. You can use the selection tools to modify specific areas, adjust the opacity of the traced layer, or even apply additional brushwork to add more details.
Experiment with different editing techniques to achieve the desired outcome. Remember, the traced image serves as a starting point, and you have complete creative control to modify and personalize it according to your artistic style.
FAQs about Automatically Tracing Images in Procreate
Can I Trace Images With Transparency in Procreate?
Yes, Procreate supports image tracing with transparency. When importing an image with transparent areas, the traced image will retain the transparency, allowing you to incorporate it seamlessly into your artwork.
Is Image Tracing Available on All Versions of Procreate?
Image tracing is available on Procreate version 4.3 and above. Make sure you have the latest version installed to access this powerful feature.
Can I Adjust the Color of the Traced Image in Procreate?
Absolutely! Procreate provides a wide range of tools for color adjustment and manipulation. You can change the color of the traced image by experimenting with Procreate’s brushes, blending modes, and adjustment layers.
Does Procreate Have Any Limitations When It Comes to Image Tracing?
While Procreate’s image tracing feature is highly versatile and efficient, it may encounter difficulties when tracing highly detailed or low-resolution images. To achieve the best results, it’s recommended to work with clear, high-resolution images with well-defined lines and shapes.
Can I Undo the Tracing and Revert to the Original Image?
Yes, you can easily undo the tracing and revert to the original image. Simply delete or hide the traced layer, and you will be left with the original image layer intact.
Can I Export the Traced Image as a Vector File?
Unfortunately, Procreate does not support the direct export of traced images as vector files. However, you can export your artwork as a high-resolution image file, such as JPEG or PNG, and then use other software like Adobe Illustrator to convert it into a vector format if needed.
Conclusion
In conclusion, Procreate’s automatic tracing feature provides artists and designers with a powerful tool to streamline their creative process. By following the steps outlined in this guide, you can easily and effectively trace images in Procreate, allowing you to create stunning digital illustrations with ease. We have explored how to automatically trace an image in procreate.
Remember to experiment, explore different techniques, and let your creativity flow. Procreate offers a wealth of features and tools to support your artistic journey, and the automatic image-tracing feature is just one of them. Embrace the possibilities, push your boundaries, and unlock your full artistic potential with Procreate.
You may read also How to Change Lip Color in Photoshop