

Introduction
In the world of digital art and photo editing, the possibilities are endless. With advanced software like Adobe Photoshop, you can transform images in ways that were once unimaginable. One popular technique is changing lip color in Photoshop, allowing you to experiment with different shades and create stunning makeup looks without ever touching a lipstick.

In this comprehensive guide, we will delve into the art of changing lip color in Photoshop, step by step. Whether you’re a professional photographer, a makeup enthusiast, or someone who simply wants to enhance their photos, this article will provide you with the knowledge and tools to achieve the perfect lip color transformation. We are going to explore how to change lip color in photoshop.
How to Change Lip Color in Photoshop: Step-by-step Guide
Step 1: Opening the Image in Photoshop
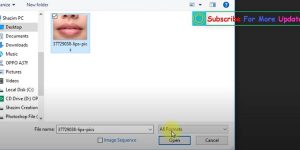
To begin, launch Adobe Photoshop and open the image you want to work with. You can do this by going to “File” and selecting “Open,” or by using the shortcut Ctrl + O (Command + O on a Mac). Choose the image file from your computer and click “Open.”
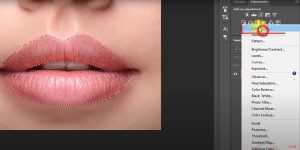
Step 2: Selecting the Lips
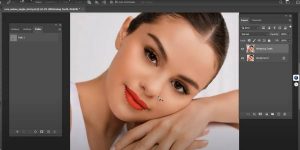
Once your image is open, zoom in on the lips using the zoom tool (shortcut: Z) or by pressing Ctrl and the plus sign (+) simultaneously (Command and plus sign (+) on a Mac). Zoom in until the lips are visible and fill a significant portion of the screen. This will make it easier to work with the details.
Step 3: Creating a New Layer
Before we start changing the lip color, it’s essential to work on a separate layer. This allows us to make adjustments without affecting the original image. To create a new layer, go to the Layers panel on the right side of the screen. Click on the “New Layer” button (the icon resembles a square with a folded corner) or use the shortcut Shift + Ctrl + N (Shift + Command + N on a Mac). Name the layer “Lip Color” and click “OK.”
Step 4: Selecting the Brush Tool
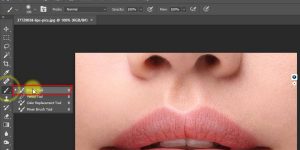
The Brush Tool is the key to changing the lip color in Photoshop. Select it from the toolbar on the left side of the screen. You can also use the shortcut B to access the brush quickly.
Step 5: Choosing the Desired Lip Color
Now comes the fun part: selecting the lip color you want to apply. Photoshop offers an extensive range of colors to choose from. To select a color, click on the small square color swatch located at the bottom of the toolbar on the left side of the screen. This will open the Color Picker window, where you can choose a color either by manually adjusting the sliders or by entering specific color values. Once you’ve chosen your desired lip color, click “OK.”
Step 6: Applying the Lip Color
With the Brush Tool selected and your chosen lip color in hand, it’s time to apply the new color to the lips. Make sure your “Lip Color” layer is selected in the Layers panel. Adjust the brush size according to your preference and carefully paint over the lips with the new color. If you make a mistake or want to refine the edges, you can use the Eraser Tool (shortcut: E) to clean up the areas outside the lips.
Step 7: Blending and Refining
To make the lip color change appear more natural, we need to blend and refine the color. This is where the magic of Photoshop comes into play. Select the “Lip Color” layer and navigate to the top of the Layers panel. Locate the opacity slider and adjust it to your liking. Lowering the opacity will create a more transparent effect, blending the new lip color with the original lips. Experiment with different opacity levels until you achieve the desired result.
Step 8: Adding Highlights and Shadows
To enhance the realism of the lip color change, we can add highlights and shadows. Create a new layer above the “Lip Color” layer and name it “Highlights.” Set the blending mode of this layer to “Screen.” Using a soft brush, paint over the areas of the lips that catch the light, such as Cupid’s bow and the center of the lower lip.
This will add a subtle highlight effect, making the lips appear more three-dimensional. Similarly, create another new layer named “Shadows” and set its blending mode to “Multiply.” Use a darker shade of the lip color and brush over the areas that would naturally cast shadows, such as the corners of the mouth. This will add depth and dimension to the lips.
Step 9: Final Adjustments and Touch-ups
To perfect the lip color change, you can make additional adjustments and touch-ups. Experiment with different blending modes for the “Lip Color,” “Highlights,” and “Shadows” layers to achieve the desired effect. You can also adjust the opacity of each layer to fine-tune the overall appearance. If necessary, use the Clone Stamp Tool (shortcut: S) or the Healing Brush Tool (shortcut: J) to fix any imperfections or blemishes around the lips.
Frequently Asked Questions (FAQs)
Can I Change Lip Color in Photoshop Without Affecting Other Parts of the Image?
Yes, by working on a separate layer, you can change the lip color without altering the rest of the image. This allows for precise adjustments and easy modifications.
Can I Apply Different Lip Colors to Different Parts of the Lips?
Absolutely! With Photoshop’s advanced tools and techniques, you can apply multiple lip colors to different areas of the lips. Simply create additional layers and follow the same process outlined in this guide.
Does Changing Lip Color in Photoshop Require Advanced Editing Skills?
While some familiarity with Photoshop is beneficial, changing lip color is a relatively straightforward process. By following the step-by-step instructions provided in this article, even beginners can achieve impressive results.
Can I Use This Technique to Change Lip Color in Group Photos?
Certainly! The process remains the same for group photos. However, you may need to adjust the brush size and make individual lip color changes for each person in the photo.
Are There Any Limitations to Changing Lip Color in Photoshop?
The only limitation is your creativity and imagination. With Photoshop’s vast array of tools and features, you can explore endless possibilities when it comes to changing lip color and creating stunning makeup effects.
Can I Change Lip Color in Photoshop Using a Tablet or a Touchscreen Device?
Yes, Photoshop supports tablets and touchscreen devices. You can use a stylus or your finger to apply the lip color and make adjustments, just like you would with a mouse or a trackpad.
Conclusion
Changing lip color in Photoshop is a valuable skill for photographers, makeup artists, and anyone interested in enhancing their photos. With the step-by-step guide provided in this article, you now have the knowledge and tools to transform lip colors with ease.
Remember to practice and experiment with different techniques to achieve the desired effects. Embrace your creativity and let Photoshop be your canvas for digital makeup artistry. We have explored how to change lip color in photoshop.
You may read also – How to Make a Portrait Photo Landscape