

Introduction
Photoshop is a powerful tool used by photographers, graphic designers, and artists worldwide. It offers a wide range of features to enhance and manipulate images. One fundamental technique that comes in handy while working on images is “Invert Selection.” In this article, we will delve into the process of inverting selections in Photoshop, step-by-step, to help you gain a better understanding of this essential skill. We are going to explore how to invert selection in Photoshop.

How to Invert Selection in Photoshop
Inverting a selection in Photoshop allows you to change the focus of your edits or apply changes to the non-selected area of an image. This technique proves to be incredibly useful when you want to make adjustments without affecting specific elements. Let’s dive into the step-by-step guide on how to invert selection in Photoshop.
Open Your Image in Photoshop
Launch Adobe Photoshop and open the image you want to work on. Click on “File” in the top menu, select “Open,” and choose the image from your computer.
Make a Selection
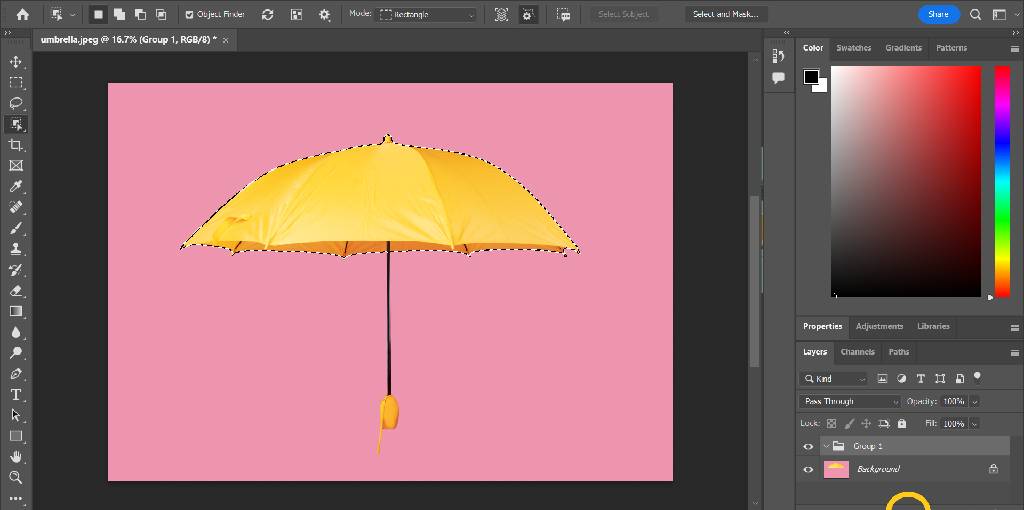
Use the selection tool of your choice (e.g., Marquee Tool, Lasso Tool, Magic Wand Tool) to select the area you want to invert. Ensure that you have an active selection around the desired region.
Inverse the Selection
With the selection active, go to the “Select” menu in the top toolbar and click on “Inverse” from the dropdown. Alternatively, you can use the keyboard shortcut “Ctrl+Shift+I” (Windows) or “Cmd+Shift+I” (Mac).
Verify the Inverted Selection
Once you’ve inverted the selection, you’ll notice that the marching ants (dotted lines) now encompass the previously unselected area.
Apply Changes or Edits
Now that you have successfully inverted the selection, you can apply changes, adjustments, or filters to the newly selected area without affecting the initial selection.
Remove the Selection
To remove the selection, click on “Select” in the top menu and choose “Deselect” or use the shortcut “Ctrl+D” (Windows) or “Cmd+D” (Mac).
Tips for Efficiently Inverting Selections
Inverting selections can be a powerful technique, but it requires some finesse to use it effectively. Here are some tips to help you master the art of inverting selections in Photoshop:
- Use Keyboard Shortcuts: Memorize essential keyboard shortcuts like “Ctrl+Shift+I” (Windows) or “Cmd+Shift+I” (Mac) for quick and efficient selection inversions.
- Combine Selection Tools: Experiment with combining different selection tools to create complex selections and then invert them to achieve precise results.
- Utilize Feathering: Applying a feather to your selection can help create smoother transitions when inverting, leading to more natural-looking edits.
- Save Selections: Save selections as alpha channels or selection masks for future use, saving time on repetitive tasks.
- Undo History: If you accidentally invert the wrong selection or make unwanted changes, use the “History” panel to revert to a previous state.
Common Mistakes to Avoid
When working with complex images and intricate selections, mistakes can happen. To avoid frustration and save time, keep an eye out for these common errors:
- Inverting an Empty Selection: Before inverting, ensure that you have an active selection. Inverting an empty selection will result in selecting the entire canvas.
- Forgetting to Deselect: After applying changes to the inverted selection, remember to deselect before proceeding with other actions to prevent unintentional modifications.
- Not Using Adjustment Layers: Instead of making direct edits on the image, consider using adjustment layers to apply changes non-destructively.
Frequently Asked Questions (FAQs)
Can I Invert Multiple Selections Simultaneously in Photoshop?
No, Photoshop allows you to invert only one active selection at a time.
How Can I Invert a Selection Based on Color in Photoshop?
To invert a selection based on color, you can use the “Select > Color Range” option, choose the color you want to select, and then click “OK.” Next, invert the selection using the “Select > Inverse” command.
Does Inverting a Selection Affect Image Resolution or Quality?
Inverting a selection does not directly affect image resolution or quality. However, any changes or edits made to the inverted selection can impact the overall image.
Can I Invert a Selection in Photoshop Elements as Well?
Yes, the process of inverting a selection is similar in Photoshop Elements. Follow the same steps mentioned earlier to achieve the desired result.
Can I Use the “Invert” Command on Text Layers in Photoshop?
No, the “Invert” command is not applicable to text layers. It works only on pixel-based selections.
How Do I Invert a Selection Using a Quick Mask in Photoshop?
To invert a selection using a Quick Mask, make sure you have the Quick Mask mode activated. Use a brush tool with black color to paint over the area you want to select. Then, exit Quick Mask mode, and the area will be inverted as a selection.
Conclusion
Inverting selections in Photoshop is a valuable technique that allows you to make precise and targeted edits to your images. By following the step-by-step guide and implementing the tips provided, you can efficiently use this feature to enhance your creative projects.
Remember to avoid common mistakes and explore the various selection tools Photoshop offers to unleash your creativity fully. Now that you have a better understanding of how to invert selections, go ahead and experiment with this powerful tool to elevate your image editing skills. We have explored how to invert selection in Photoshop.